How To Create A WordPress Theme With A Local Host?
Create A WordPress Theme
Without a doubt, WordPress ranks among the most popular content management systems present. It has helped launch numerous kinds of websites in large numbers. It is no secret that the software itself has been quite useful for testing. In such a case, installing WordPress themes using a local host is better instead of using a web hosting plan for it.
We will now read more about installing themes on WordPress via local hosts in six easy tips. Before that, let us have a look at the way WordPress local host version works, as well as the various ways companies can benefit from having a WordPress website hosted locally.
How does a local host version of WordPress work and what are the benefits of having a WordPress site locally hosted?
According to experts, installing a WordPress CMS locally involves the whole site being placed in a local hosting environment. Once the site makes a connection with the machine by means of a loopback address network instead of going through the internet, the local connection is established in a secure manner.
A local host WordPress website gives web design and development teams the opportunity to test features. They do that before they implement them on a live website. The outcome is a bug that can be quickly fixed without harming user experience (UX).
There are professionals who are keen to learn about web development (particularly WordPress development). They too can benefit from the current version of WordPress. They can make a copy of a live version of a website on their computers, and can easily experiment with it without buying either a domain or a hosting plan.
Installing to Create A WordPress Theme with a local host – six easy steps
A lot of options in local server software are available. They help make the installation of WordPress themes on local hosts easy. Developers use XAMPP which ranks among the most popular cross-platform web servers for PHP development. Let us now have a look at those steps which can help install a WordPress theme on local hosts:
Downloading XAMPP
WordPress developers must first download XAMPP from licensed vendors and trustworthy websites. This will help them in the selection and installation of the best WordPress theme.

Installing and running XAMPP
Developers should execute the XAMPP installer and follow the instructions accordingly. This will help them install the platform on default settings. A pop-up will come and indicate that their antivirus software may affect the installation of XAMPP. Developers shouldn’t worry and instead should continue with the installation.
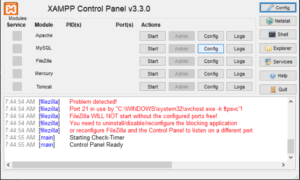
Once it has been installed, it should be executed (run) so the environment can be configured. The XAMPP control panel will help developers initiate both Apache and MySQL modules. This helps them perform the local host installation of WordPress.
Those who are using Windows will see the error message where the local host refused to connect. They need to stop programs using port 80, or temporarily disable the firewall, to resolve this issue.

WordPress should be downloaded
When the server is up and running, installing WordPress becomes easy. The latest version of WordPress should be downloaded. As it is a ZIP file, it should be extracted easily.
Developers should then navigate to the XAMPP folder installed in either C or another drive. They should find the ‘htdocs’ folder. The extracted WordPress files should be uploaded. Experts recommend renaming the folder as per the website’s name. This helps make the web development process on XAMPP much easier.
Making a local database
Developers need to go back to the XAMPP control panel. They should afterward click on the Admin button of the MySQL module. This will launch phpMyAdmin. It is the admin panel for managing MySQL and MariaDB databases. This will help them make a local MySQL database for the website to be made.
Read more: Become a pro WordPress Custom Theme Developer
Once the tab database is open, the database name should be added in the make database section. The dropdown menu’s value should be set for Collation and the create button should be clicked. The new MySQL database should appear on the page’s left side.
Installation of WordPress on Localhost
WordPress should be installed locally, using the https://localhost/foldername in the web browser. Developers should remember to change the ‘foldername’ placeholder with the folder’s name they intend to choose or create.

WordPress requires information for creating the local host site. They are as under:
- The name of database developers made in phpMyAdmin.
- The default username should be root.
- The MySQL database password field should be left blank.
- The database host should be the default “localhost.”
- The default table prefix should be “wp_.”
Once such information has been provided the submit button should be clicked and the installation should be run. Additional information should be duly added like the website’s name as well as the login credentials. Developers can afterward click on the Install WordPress button.
Checking the local site which has been created
Once the local test site is ready, developers need to go to https://localhost/foldername/wp-admin. They should use the login credentials they made so they can access the WordPress dashboard.
Read more: 10 Best VPS Server Providers In Denmark
Conclusion
A hosting plan is needed to run a WordPress installation along with a domain name. Those who require it for learning or testing purposes can install the CMS on a local host and store all data locally. This can easily meet their needs.
One thing to note is that the address bar mentioned uses Https instead of Http. The reason is that HTTPS is far more secure than its predecessor. Moreover, with technologies changing, it is wise that developers use newer ones over the previous ones.


